Template Used- News Blogger (https://blogging.pikitemplates.com/)
Document Link- https://blogging.pikitemplates.com/2021/04/documentation-of-news-blogger.html
ShortCode Link-
Documents
News Blogger Documentation with each step explained in detail Easy installation without any trouble follow below documentation and install this pretty professional template. The widgets gadgets images have been attached properly where red tic mark for better understanding easily
We hope this might help you !
Here is a detailed Documentation of News Blogger - Template
Read Carefully to Install all Gadgets on Your Website
Example of Facebook:
Example:
Here you can set DisqusShortname, and change your blog CommentSystem we Support 3 Comments Plugin Facebook, Disqus, Blogger
Example to set Disqus Comment box:
Use below shortcut code:commentsSystem = facebook or disqus or blogger
disqusShortname = pikitemplates
noThumb = image url
You can use Disqus comment box a optional feature of our template, Just go to disqus.com create account after that tap on Get Started and follow "I Want to install Disqus on my Site" as shown in above image how to setup shortname for disqus. That's done just change blogger comment system and use disqus comments pluign easilyExample of Disqus Comment:

Here you can set show more text and related posts title also you can set many related posts easily without any trouble. To change load more text edit and change from here above link list option listed.
Example of Related Posts: Use below shortcut code:relatedPostsText = You May Like These Posts - you change Related Posts title
relatedPostsNum = 3 - you can set number of Related Posts
loadMorePosts = Load More - you can change Load More Homepage button text
Example of Load More text:

Here you can set Sticky Sidebar and Sticky Menu easily by giving value true or false. as shown in the above image.Use below shortcut code:fixedSidebar = true or false - you change sticky sidebar fixed to scrolled
fixedMenu = true or false - you change sticky menu fixed to scrolled
showMoreText = Show More - you can easily change Show More text in Featured Posts


Here you can change your blog main logo click on remove and upload your new logo in your website. and try to compress your logo (various online image png compression tools available) compression can helps you to boost up your website speed.
Bottom Updates Section Recent Posts :-

Use this Shortcut Code
5/sgrid/recent
For Simple/ List Grid Label Posts :-
Use this Shortcut Code
Just Put label='recent' or label='Happy Life' to display Breaking Posts

here you can use this gadget to implement your ads in your posts section only. these shows in posts top and bottom area as per your requirements Also below you can the Shortcode to show ad in a specific area of the post paragraph so that on invalid click activity you can just turn off this Posts Top Ads section and all ads from inside posts automatically turned off
Use the Shortcode :- (ads1)


Sidebar Section :- Open Layout > then click on Edit Icon > in the Social Widget (section) gadget.

Here you can add a social media link in your sidebar by using shortcut code in LinkList Gadget as shown in the above image
Other Sidebar Gadgets :- Open Layout > then Click on Edit Icon > and Select or Add a Gadget like Popular Posts, Follow by Email, LinkList, BlogSearch, Contact Form etc.
All the Features are Designed in this template you can use on your blog
Footer Section :- Open Layout > then click on Edit Icon > in the Footer Section

Here you can use Custom Footer FeaturedPosts By Using this Shortcut code
For Recent Posts :-
Use this Shortcut Code
For Label Posts :-
Use this Shortcut Code
We hope this might help you !
- Buy Now: News Blogger Blogger Template - Download/Preview
- Installation - How to Install Blogger Template with Clean Gadgets
- Video Docs - Video Documentation of News Blogger template
- Shortcut Codes - Piki Templates Posts, Pages, and Buttons Short Codes
Here is a detailed Documentation of News Blogger - Template
Read Carefully to Install all Gadgets on Your Website
2. Admin Control Panel:
To edit or handle the blog posts, comments system, no. of posts, fixed menu, Facebook SDK plugin, etc. These Options Can be Controlled from Layout in Blogger Dashboard.2.1). Facebook SDK (Plugin):
Here you can use this gadget to install the Facebook comment box and Facebook page in the sidebar. For More Click Here.Example of Facebook:
Note: Below in details, all important steps provided for setup Facebook Comments System/Facebook Page on sidebar
2.2). Default Variables/Comments:
Open Layout > then click on Edit Icon > in the Default Variables gadget.Example:
Example to set Disqus Comment box:
Use below shortcut code:commentsSystem = facebook or disqus or blogger
disqusShortname = pikitemplates
noThumb = image url
You can use Disqus comment box a optional feature of our template, Just go to disqus.com create account after that tap on Get Started and follow "I Want to install Disqus on my Site" as shown in above image how to setup shortname for disqus. That's done just change blogger comment system and use disqus comments pluign easilyExample of Disqus Comment:
Note: Many Users Facing Problem adding Disqus Comment Box make sure you have added website link and created profile short name in Disqus.
2.3). Related Posts/ Show Texts:
Open Layout > then click on Edit Icon > in the Related Posts/ Email text gadget.Example:Example of Related Posts:
relatedPostsNum = 3 - you can set number of Related Posts
loadMorePosts = Load More - you can change Load More Homepage button text
Example of Load More text:
Note: Use only Lowercase(small letters) letter in shortcode as display in above image.
2.4). Lazy Scrolls/ More Text:
Open Layout > then click on Edit Icon > in the Lazy Scrolls/ More Text gadget.Example:fixedMenu = true or false - you change sticky menu fixed to scrolled
showMoreText = Show More - you can easily change Show More text in Featured Posts
Note: Use only Lowercase(small letters) letter in shortcode as display in above image.
Top Pages Gadget :- Open Layout > then click on Edit Icon > in the Top Pages Section gadget.
Here you can change Top Pages Links which show at top of Template and also in Mobile view these pages automatically shows under Mobile Slider Menu. You can edit and replace links from here as per your requirements
Here you can add a social media link in your topbar by using shortcut code in LinkList Gadget as shown in the above image. Remember these social media icons automatically shows into Mobile Menu Slider.
All the Features are Designed in this template you can use on your blog
Social Icons :- This template support various social icons like facebook, whatsapp, instagram, pinterest, blogger, reddit, youtube, linkedin, twitter etc.
All the Features are Designed in this template you can use on your blog
Here you can change your blog main logo click on remove and upload your new logo in your website. and try to compress your logo (various online image png compression tools available) compression can helps you to boost up your website speed.
Note:- Use optimised image in your head logo to enhance website speed .
Top Tags Menu :- Open Layout > then click on Edit Icon > in the Top Tags Menu gadget.

Here you can use this gadget to show custom top trending tags easily on your website at top of homepage header, you can also add new button links and edit them as per your requirement.
Main Menu :- Open Layout > then click on Edit Icon > in the Main Menu gadget.

All the main menu items can be edit and can be changed properly above the image is provided you to understand properly.
To Create Mega Menu use Code
1:- For Recent Posts in Mega Menu
Use Shortcut Code :-
Happy Life (in First Box)
megamenu/recent (in Second Box)
 For Featured Popular Posts :-
Use this Popular Posts Gadget
Remember to set at least 5 posts in Popular Posts Gadget to show completely in homepage
All the main menu items can be edit and can be changed properly above the image is provided you to understand properly.
To Create Mega Menu use Code
1:- For Recent Posts in Mega Menu
Use Shortcut Code :-
Happy Life (in First Box)
megamenu/recent (in Second Box)
2 :- For Label Posts in Mega Menu
Use Shortcut Code :-
Happy Life (in First Box)
megamenu/Happy Life (in Second Box)
Make Sure Use megamenu/Happy Life in 2nd Box. where Happy Life is a Example Label
To Create submenu use one underscore tab ( _submenu)
To Create more merging submenu use double underscore tab ( __submenu)
Use Shortcut Code :-
Happy Life (in First Box)
megamenu/Happy Life (in Second Box)
Make Sure Use megamenu/Happy Life in 2nd Box. where Happy Life is a Example Label
To Create submenu use one underscore tab ( _submenu)
To Create more merging submenu use double underscore tab ( __submenu)
Note:- Use shortcut code correctly to make working menu functions .
Breaking Slider :- Open Layout > then click on Edit Icon > in the Breaking Slider (section) gadget.

Here you can use this section to display Responsive Breaking News Slider with both label and Recent Shortcut Code
For Recent Posts :-
Use this Shortcut Code
6/trending/recent
For Label Posts :-
Use this Shortcut Code
6/trending/Your Label
Just Put label = recent or label = Happy Life to display Breaking Posts
and type of shortcode is type = trending
Note:- All the Shortcut Codes Already installed and Provided with Template.
Hot Posts :- Open Layout > then click on Edit Icon > in the Hot Posts gadget.

Here you can use this section gadget to show sliding vertical trending news posts easily with the help od blogger popular posts gadget without any trouble, easiest way and faster loading widgets in blogger
Feature Posts :- Open Layout > then click on Edit Icon > in the Feature Posts (section) gadget.
1) You can use Popular Posts Gadget Also and Custom Featured Posts Gadget Also
1) You can use Popular Posts Gadget Also and Custom Featured Posts Gadget Also
Use this Popular Posts Gadget
2) Featured Post Gadget with Jquery where you can insert label

Here you can use this section to display Responsive Feature with both label and Recent Shortcut Code
For Featured Recent Posts :-
Use this Shortcut Code
featured/recent
For Featured Label Posts :-
Use this Shortcut Code
featured/Your Label
Just Put label = recent or label = Happy Life to display Feature Posts
and type of shortcode is type = featured
Note:- All the Shortcut Codes Already installed and Provided with Template .
Fresh Posts Section :- Open Layout > then click on Edit Icon > in the Fresh Posts Section gadget.

Here you can use this section to display Responsive Mega Grid Posts with both label and Recent Shortcut Code
For Fresh Posts Recent Posts :-
Use this Shortcut Code
For Fresh Posts Recent Posts :-
Use this Shortcut Code
4/sgrid/recent
For Fresh Posts Label Posts :-
Use this Shortcut Code
4/sgrid/Your Label
Just Put label = recent or label = Happy Life to display Featured Posts
For Fresh Posts Label Posts :-
Use this Shortcut Code
4/sgrid/Your Label
Just Put label = recent or label = Happy Life to display Featured Posts
and type of shortcode is type= sgrid
Here you can use this section to display Responsive Fresh Posts with both label and Recent Shortcut Code
Main Feature Posts :- Open Layout > then click on Edit Icon > in the Main Feature Posts (section) gadget.

Here you can use this section to display Responsive Mega Grid Posts with both label and Recent Shortcut Code
For Mega Grid Recent Posts :-
Use this Shortcut Code
Here you can use this section to display Responsive Mega Grid Posts with both label and Recent Shortcut Code
For Mega Grid Recent Posts :-
Use this Shortcut Code
megagrid/recent
For Mega Grid Label Posts :-
Use this Shortcut Code
megagrid/Your Label
Just Put label = recent or label = Happy Life to display Featured Posts
For Mega Grid Label Posts :-
Use this Shortcut Code
megagrid/Your Label
Just Put label = recent or label = Happy Life to display Featured Posts
and type of shortcode is type= megagrid
Just Put label = recent or label = Happy Life to display Left/Right Posts
Here you can use this section to display Responsive Mega Grid Posts with both label and Recent Shortcut Code
For Left/Right Recent Posts :-


Use this Shortcut Code
5/col-left/recent
For Left/Right Recent Posts :-
Use this Shortcut Code
5/col-left/recent
5/col-right/recent
For Left/Right Label Posts :-
Use this Shortcut Code
For Left/Right Label Posts :-
Use this Shortcut Code
5/col-left/Your Label
5/col-right/Your Label
Just Put label = recent or label = Happy Life to display Left/Right Posts
and type of shortcode is type = col-left and type = col-right
Note:- First Use Left Side Code then Right Side Code for Proper View in Blog .
Bottom Updates Section Recent Posts :-
Use this Shortcut Code
5/sgrid/recent
5/lgrid/recent
For Simple/ List Grid Label Posts :-
Use this Shortcut Code
5/sgrid/Your Label
5/lgrid/Your Label
Just Put label='recent' or label='Happy Life' to display Breaking Posts
and type of shortcode is type='sgrid' and type='lgrid' here no='5' total number of posts that you want to show
Inside Posts Ads :-
Inside Posts Ads :-
Open Layout > then click on Edit Icon > in the Top / Bottom Posts Ad (section) gadget.
Use the Shortcode :- (ads1)
Note:- Use this Shortcut Code to display Custom ads from Top Section ad Gadgets to display in Posts Paragraph Remember this code only works if Top Posts Posts ad code and Bottom Posts ad code Section Added (make a strike on shortcode to work as below screenshot)
Post Author Social icons :- Open Blogger Setting > then Choose Edit Blogger Profile > and paste ShortCode.


After editing Blogger Author Profile follow the below instructions provided in the screenshot
Here use the below shortcut code to display social media icons here
HTML Code :- <a href="Your Link Here">Icon Name</a>
HTML Example :- <a href="https://instagram.com/pikitemplates">instagram</a>
HTML Code :- <a href="Your Link Here">Icon Name</a>
HTML Example :- <a href="https://instagram.com/pikitemplates">instagram</a>
Social Icons :- This template support various social icons like facebook, whatsapp, instagram, pinterest, blogger, reddit, youtube, linkedin, twitter etc.
Add this Short code :
<div class="fb-page" data-href="YOUR FACEBOOK PAGE URL" data-width="500" data-small-header="false" data-adapt-container-width="true" data-hide-cover="false" data-show-facepile="true"></div>Note :- here in data-href Replace with your own link of your facebook page so install Facebook page on your template
Remember : This Facebook plugin works only if for both Facebook Page and Facebook Comment Box You have Installed below facebook sdk code in admin section follow below steps provided here
here you can add Facebook SDK Code to Show Facebook Comments in Template Also Turn of Facebook Comment System From Default Variables as shown in First Admin Section at top of documentation. Copy Code from below box and paste in Admin Section of Facebook Plugin gadget.
Facebook SDK en_US :
https://connect.facebook.net/en_US/sdk.js#xfbml=1&version=v8.0Note :- Only this Sdk Code Shows both facebook page in sidebar and facebook comment box as you want to set on your blog
Sidebar Section :- Open Layout > then click on Edit Icon > in the Social Widget (section) gadget.
Here you can add a social media link in your sidebar by using shortcut code in LinkList Gadget as shown in the above image
Social Icons :- This template support various social icons like facebook, whatsapp, instagram, pinterest, blogger, reddit, youtube, linkedin, twitter etc.
Other Sidebar Gadgets :- Open Layout > then Click on Edit Icon > and Select or Add a Gadget like Popular Posts, Follow by Email, LinkList, BlogSearch, Contact Form etc.
All the Features are Designed in this template you can use on your blog
Footer Section :- Open Layout > then click on Edit Icon > in the Footer Section
Here you can use Custom Footer FeaturedPosts By Using this Shortcut code
For Recent Posts :-
Use this Shortcut Code
5/footer/recent
For Label Posts :-
Use this Shortcut Code
5/footer/Your Label
Footer Social Media :- Open Layout > then click on Edit Icon > in the Footer Section

Here you can add social media icons to display on your blog links of social media display in Footer Section
here you can insert your pages links to show at bottom of the template as shown in above image
Turn Blog Feed " Full " :- Open Blogger Dashboard > Tap on Settings then Scroll to Other > Site Feed

here by default Blog Site Feed is Always Full (Not Change to its Options)
Footer Social Media :- Open Layout > then click on Edit Icon > in the Footer Section
Here you can add social media icons to display on your blog links of social media display in Footer Section
Social Icons :- This template support various social icons like facebook, whatsapp, instagram, pinterest, blogger, reddit, youtube, linkedin, twitter etc.
Turn Blog Feed " Full " :- Open Blogger Dashboard > Tap on Settings then Scroll to Other > Site Feed
here by default Blog Site Feed is Always Full (Not Change to its Options)
Note:- Follow the instructions given here to turn on blog feed in full mode always.
Short Code
Follow the below steps to use our V.1.0.0 Shortcodes in your template to make more easy tools for your website
These shortcodes can be used in both free and premium templates, and there are no coding or HTML skills required to use them. This is the simplest method to install everywhere throughout posts and pages as required.

Here below in Image Choose the tags You want to Implement so that Table of Content will Work


My Button (normal-bt)
after typing shortcode in brackets. It's Done You have successfully added the button shortcode.

After Applying the Shortcode Results Should be Like This Refer Below Image :


My Button (download)
Buy Button (buy)
Cart Button (cart)
Link Button (link)

Open Button (open)

Info Button (info)
Demo Button (demo)


1.5 Full Width /Left-Sidebar /Right-Sidebar


after typing shortcode in brackets. It's Done You have successfully added the success message shortcode.

after typing shortcode in brackets. It's Done You have successfully added the passed message shortcode.
After Applying the Shortcode Results Should be Like This Refer Below Image :

after typing shortcode in brackets. It's Done You have successfully added the warning message shortcode.
After Applying the Shortcode Results Should be Like This Refer Below Image :

after typing shortcode in brackets. It's Done You have successfully added the error message shortcode.
After Applying the Shortcode Results Should be Like This Refer Below Image :

after typing shortcode in brackets. It's Done You have successfully added the code box message shortcode.

1.0 Table of Content
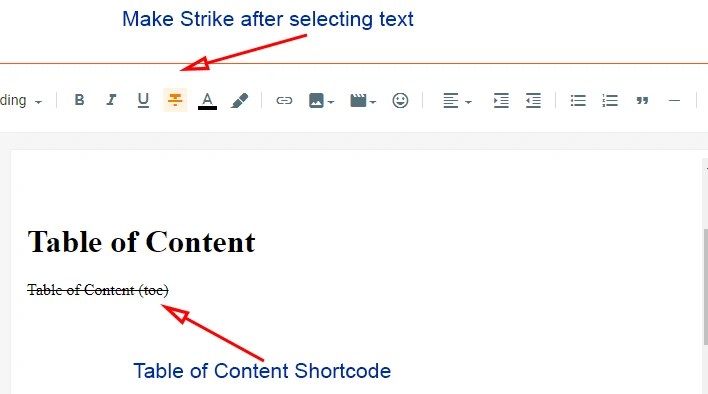
Open any post & page and type (toc) as shown below image. After typing make it strike like below
Shortcode : (toc)
Example : Table of Content (toc)
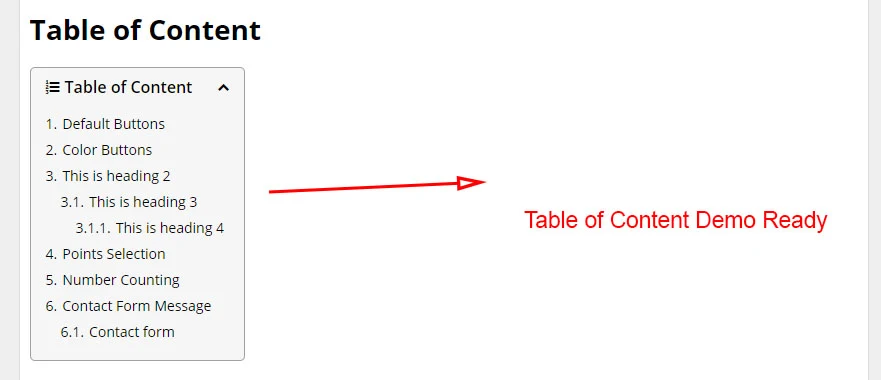
After Applying the Shortcode Results Should be Like This Refer Below Image :
Note :- This Shortcode Only Works if You Have Added H2, H3, H4 Tags in Your Post. Don't Know How to Create H2, H3, H4 Tags Follow Below Procedure
1.0.1 How to Use H2,H3,H4 Tags
Open any post & page select the line type as shown below image. And Select the Option of Paragraph Headings here
Here below in Image Choose the tags You want to Implement so that Table of Content will Work
Done H2 tag is Ready
1.1 Adding Drop Caps
Open any post & page select the first-word type (caps) as shown below image. After typing make it strike like below
Shortcode : (caps)
Example : L(caps)orem
After Applying the Shortcode Results Should be Like This Refer Below Image :
1.2 Default Buttons
Before using buttons shortcodes, Firstly add link into the text using this method as shown below here
After inserting link then type shortcode like (small-bt)
(i) Default Button
Open any post & page type (normal-bt) as shown below image. After typing make it strike like below
Shortcode : (normal-bt)
after typing shortcode in brackets. It's Done You have successfully added the button shortcode.
After Applying the Shortcode Results Should be Like This Refer Below Image :
(ii) Small Buttons
Open any post & page type (small-bt) as shown below image. After typing make it strike like below
Shortcode : (small-bt)
Example : My Button (small-bt)
after typing shortcode in brackets. It's Done You have successfully added a small button shortcode.
(ii) Medium Buttons
Open any post & page type (medium-bt) as shown below image. After typing make it strike like below
Shortcode : (medium-bt)
Example : My Button (medium-bt)
after typing shortcode in brackets. It's Done You have successfully added a medium button shortcode.(iii) Large Buttons
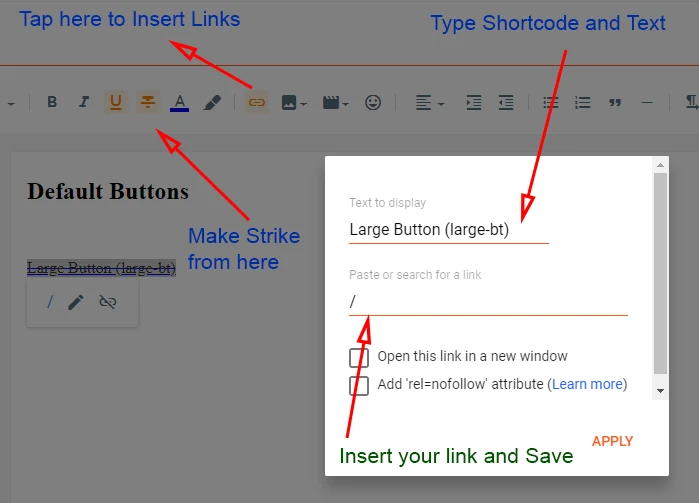
Open any post & page type (large-bt) as shown below image. After typing make it strike like below
Shortcode : (large-bt)
Example : My Button (large-bt)
after typing shortcode in brackets. It's Done You have successfully added a large button shortcode.
1.3 Color Buttons
To use color buttons in your website follow the steps below
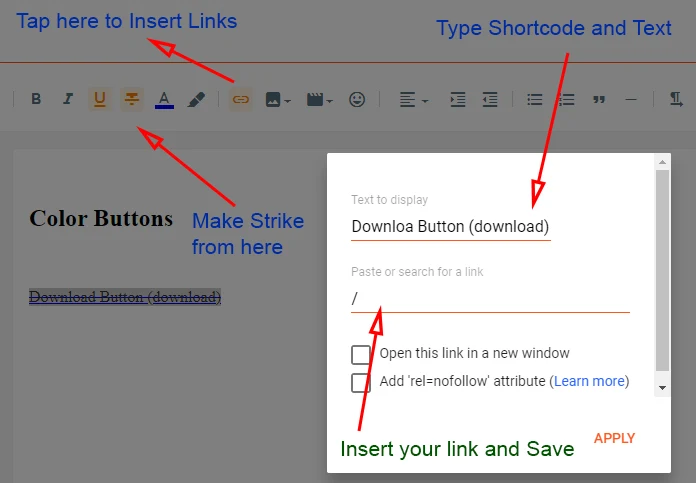
(i) Download Button
Open any post & page type (download) as shown below image. After typing make it strike like below
Shortcode : (download)
after typing shortcode in brackets. It's Done You have successfully added the download button shortcode.
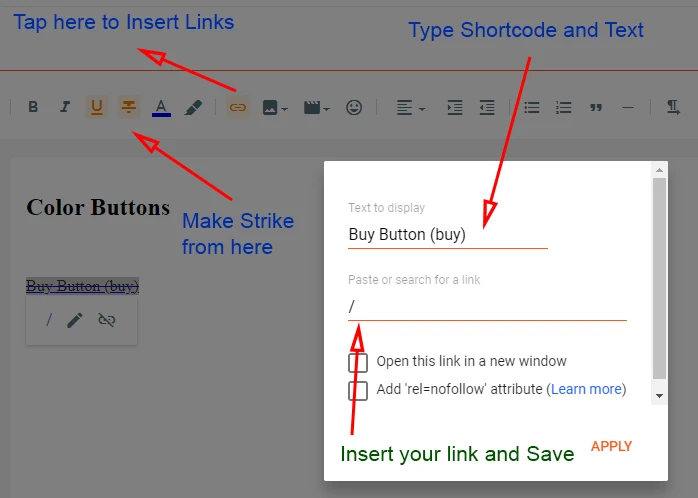
(ii) Buy Buttons
Open any post & page type (buy) as shown below image. After typing make it strike like below
Shortcode : (buy)
after typing shortcode in brackets. It's Done You have successfully added a buy button shortcode.
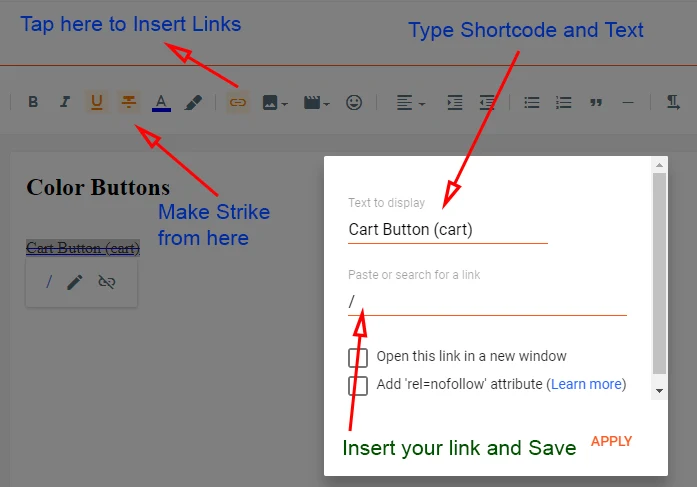
(iii) Cart Buttons
Open any post & page type (cart) as shown below image. After typing make it strike like below
Shortcode : (cart)
after typing shortcode in brackets. It's Done You have successfully added a cart button shortcode.
(iv) Link Buttons
Open any post & page type (link) as shown below image. After typing make it strike like below
Shortcode : (link)
after typing shortcode in brackets. It's Done You have successfully added a link button shortcode.
(v) Open Buttons
Open any post & page type (open) as shown below image. After typing make it strike like below
Shortcode : (open)
after typing shortcode in brackets. It's Done You have successfully added an open button shortcode.
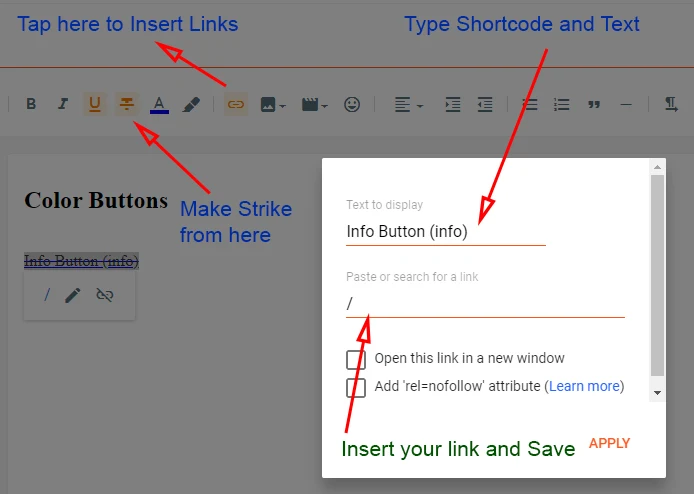
(vi) Info Buttons
Open any post & page type (info) as shown below image. After typing make it strike like below
Shortcode : (info)
after typing shortcode in brackets. It's Done You have successfully added an info button shortcode.
(vii) Demo Buttons
Open any post & page type (demo) as shown below image. After typing make it strike like below
Shortcode : (demo)
after typing shortcode in brackets. It's Done You have successfully added a demo button shortcode.
1.4 Contact Form
Open any post & page and type (contact-form) as shown below image. After typing make it strike like below
Shortcode : (contact-form)
after typing shortcode in brackets. It's Done You have successfully added a contact form shortcode.
After Applying the Shortcode Results Should be Like This Refer Below Image :
1.5 Full Width /Left-Sidebar /Right-Sidebar
Use Below Shortcode to make Left Sidebar and Right Sidebar and Full Width as per requirements you want to use on your blog
(i) Full Width
Open any post & page and type (full-width) as shown below image. After typing make it strike like below
Shortcode : (full-width)
after typing shortcode in brackets. It's Done You have successfully added a Full Width shortcode.
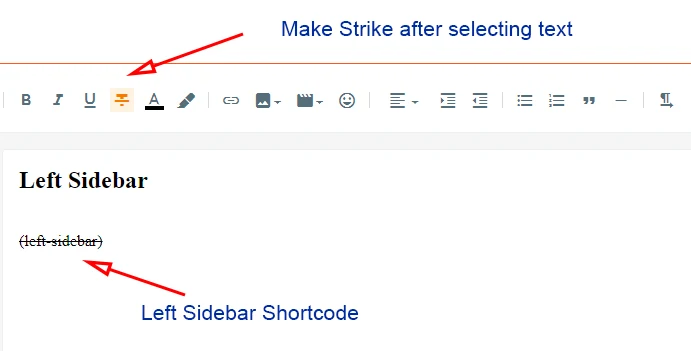
(ii) Left Sidebar
Open any post & page and type (left-sidebar) as shown below image. After typing make it strike like below
Shortcode : (left-sidebar)
after typing shortcode in brackets. It's Done You have successfully added a Left Sidebar shortcode.
(iii) Right Sidebar
Open any post & page and type (right-sidebar) as shown below image. After typing make it strike like below
Shortcode : (right-sidebar)
after typing shortcode in brackets. It's Done You have successfully added a Right Sidebar shortcode.
1.6 Alert Message
Use the This Type Format
(i) Alert Message Success
Open any post & page type (alert-success) in last as shown below image. After typing make it blockquote
Shortcode : (alert-success)
Example : This is a alert message test here which is awesome box (alert-success)after typing shortcode in brackets. It's Done You have successfully added the success message shortcode.
After Applying the Shortcode Results Should be Like This Refer Below Image :
(ii) Alert Message Passed
Open any post & page type (alert-passed) in last as shown below image. After typing make it Blockquote like below
Shortcode : (alert-passed)
Example : This is a alert message test here which is awesome box (alert-passed)after typing shortcode in brackets. It's Done You have successfully added the passed message shortcode.
After Applying the Shortcode Results Should be Like This Refer Below Image :
(iii) Alert Message Warning
Open any post & page type (alert-warning) in last as shown below image. After typing make it Blockquote like below
Shortcode : (alert-warning)
Example : This is a alert message test here which is awesome box (alert-warning)after typing shortcode in brackets. It's Done You have successfully added the warning message shortcode.
After Applying the Shortcode Results Should be Like This Refer Below Image :
(iv) Alert Message Error
Open any post & page type (alert-error) in last as shown below image. After typing make it strike like below
Shortcode : (alert-error)
Example : This is a alert message test here which is awesome box (alert-error)after typing shortcode in brackets. It's Done You have successfully added the error message shortcode.
After Applying the Shortcode Results Should be Like This Refer Below Image :
(v) Code Box
Open any post & page type (code-box) in last as shown below image. After typing make it strike like below
Shortcode : (code-box)
Example : This is a code box message test here which is awesome box (code-box)after typing shortcode in brackets. It's Done You have successfully added the code box message shortcode.
After Applying the Shortcode Results Should be Like This Refer Below Image :